
“OpenPose represents the first real-time multi-person system to jointly detect human body, hand, facial, and foot key points (in total 135 keypoints) on single images.” OpenPose is a game-changer in pose detection. This library is proposed by the Perceptual Computing Laboratory of the Carnegie Mellon University.
OpenPose offers a Python as well as a C++ API. In June 2018, a CPU-only macOS support was released. This is what we’ll try right now! This article is a practical approach to the OpenPose library. A second article will develop the theory behind the library.
NB: OpenPose License clearly states that any commercial use in the domain of sports is prohibited. This simply is a toy example for personal use.
Functionalities
For detailed information, please check the GitHub repository of the project.
The most important features of OpenPose include :
- 2D multi-person real-time keypoint detection (body, hand, foot, face)
- 3D single-person real-time keypoint detection
The input should be an image, a video, your webcam, or thermic/3D cameras… The output would typically be your basic image/video with key points on top of it, in different file formats (PNG, JPG, AVI…), or simply the key points (JSON, XML, YML…).
OpenPose works under Ubuntu (14, 16), Windows (8, 10) and Mac OSX.
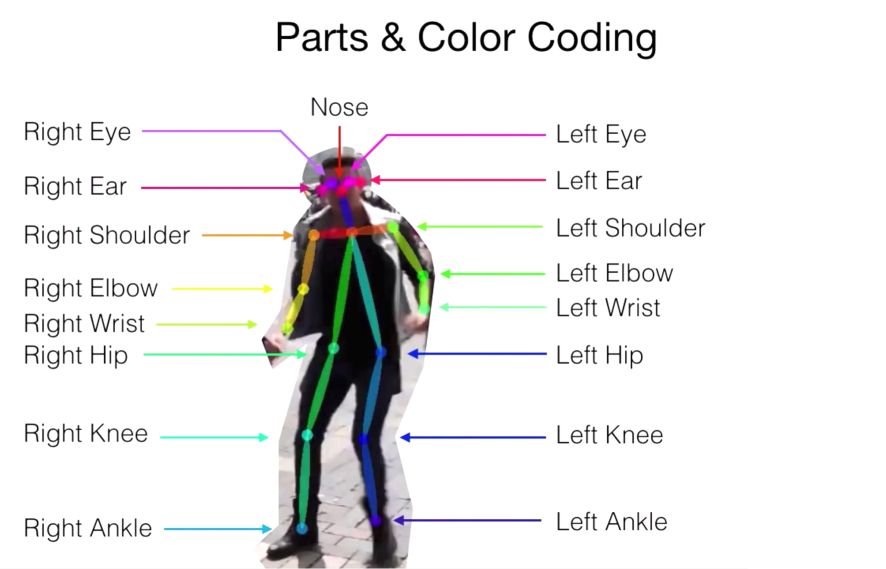
So what are those keypoints? Well, nothing’s better than a visual illustration.
The requirements regarding your Mac are the following :
- Around 8GB of free RAM memory
- a CPU with at least 8 cores
Installation
The whole installation guide can be found here.
Step 1) Clone the repository in the target folder
git clone https://github.com/CMU-Perceptual-Computing-Lab/openpose
Step 2) Install CMake GUI :
https://cmake.org/download/
Or :
brew cask install cmake
Step 3) Install dependencies :
bash 3rdparty/osx/install_deps.sh
Step 4) Generate caffe.pb.h manually using protoc as follows. In the directory, you installed Caffe to
protoc src/caffe/proto/caffe.proto --cpp_out=.
mkdir include/caffe/proto
mv src/caffe/proto/caffe.pb.h include/caffe/proto
See this issue for more details.
Step 5) Open CMake GUI and select the OpenPose directory as project source directory, and a non-existing or empty sub-directory (e.g., build) where the Makefile files (Ubuntu) or Visual Studio solution (Windows) will be generated. If the build does not exist, it will ask you whether to create it. Press Yes.
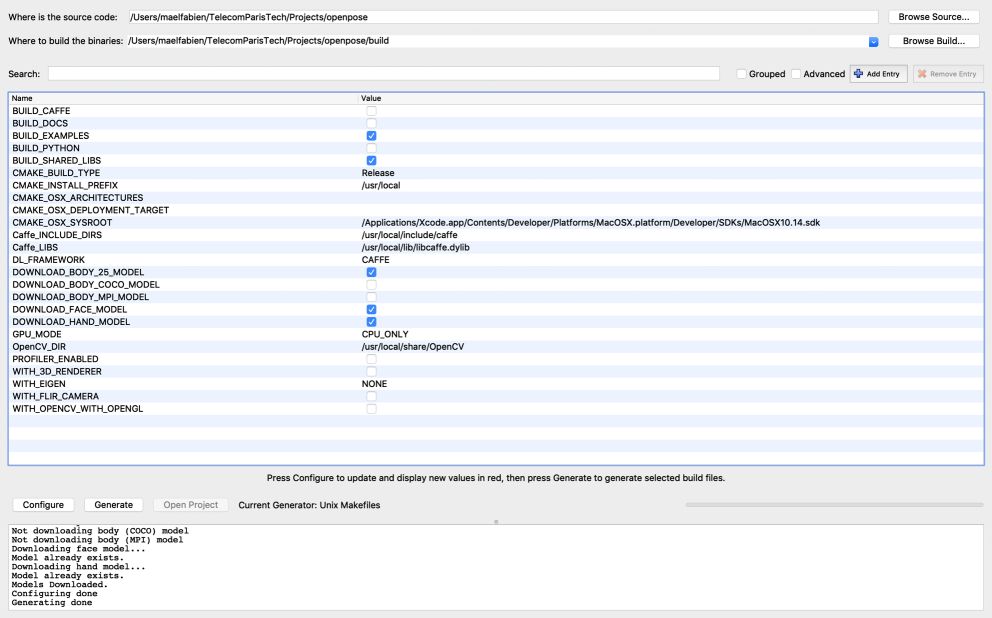
Step 6) Make the following adjustments to the CMake config before pressing “Configure”:
BUILD_CAFFE set to false
GPU_MODE set to CPU_ONLY (as recommended for MacOS)
Caffe_INCLUDE_DIRS set to /usr/local/include/caffe
Caffe_LIBS set to /usr/local/lib/libcaffe.dylib
See this issue for more details.
Step 7)
Press configure, wait until Configuring Done appears. Everything should work well, and you should be able to click the Generate right after.
If ever you get an error here, especially with High Sierra, please check this issue.
Step 8) Build the project :
cd build/
make -j`nproc`
Run OpenPose
This section refers to the Quick Start section of the GitHub of the project.
Run on videos:
Ubuntu and Mac
./build/examples/openpose/openpose.bin --video examples/media/video.avi
With face and hands
./build/examples/openpose/openpose.bin --video examples/media/video.avi --face --hand
Running on webcam:
Ubuntu and Mac
./build/examples/openpose/openpose.bin
With face and hands
./build/examples/openpose/openpose.bin --face —hand
Running on images :
Ubuntu and Mac
./build/examples/openpose/openpose.bin --image_dir examples/media/
With face and hands
./build/examples/openpose/openpose.bin --image_dir examples/media/ --face --hand
Great, this should work fine. Try to insert a new image in your media folder and run it on your image or video.
How to save the output? Several options to save the outputs exist.
For example, to save a video as a .avi file, use :
./build/examples/openpose/openpose.bin --video examples/media/film.avi --write_video out.avi --write_video_fps 5
Notice that the frames per second specified here will have a dramatic impact on the length of the algorithm execution.
For images, you can directly use --write_image
To save the keypoints positions as X,Y coordinates, use :
./build/examples/openpose/openpose.bin --video examples/media/film-short.avi --write_json output/ --display 0 --render_pose 0
The --display 0 --render_pose 0 allows the algorithm to run without the video popup.
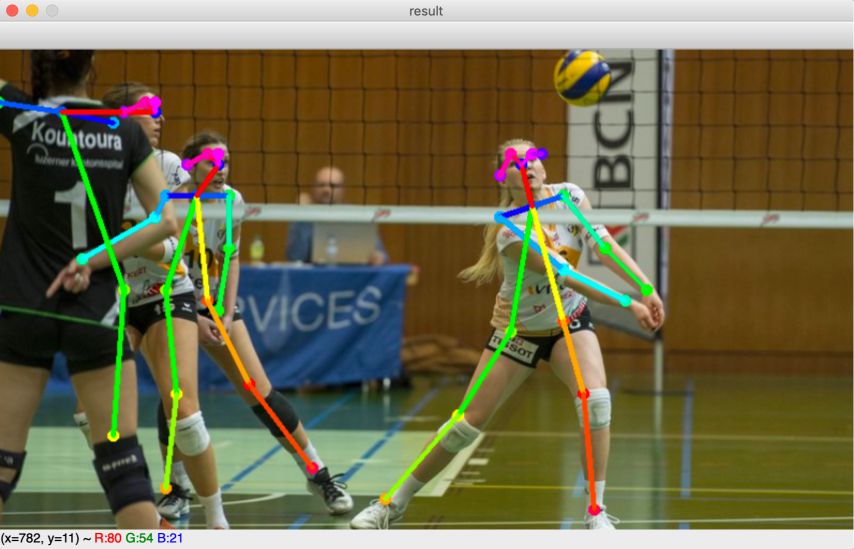
It’s time to check the final output of our work!
**Conclusion **: I hope you enjoyed this quick tutorial on OpenPose for macOS. I am looking forward to making a more developed article on the field of pose recognition!