
Inception is a deep convolutional neural network architecture that was introduced in 2014. It won the ImageNet Large-Scale Visual Recognition Challenge (ILSVRC14). It was mostly developed by Google researchers. Inception’s name was given after the eponym movie.
The original paper can be found here.
Inception architecture can be used in computer vision tasks that imply convolutional filters.
What is an inception module?
In Convolutional Neural Networks (CNNs), a large part of the work is to choose the right layer to apply, among the most common options (1x1 filter, 3x3 filter, 5x5 filter or max-pooling). All we need is to find the optimal local construction and to repeat it spatially.
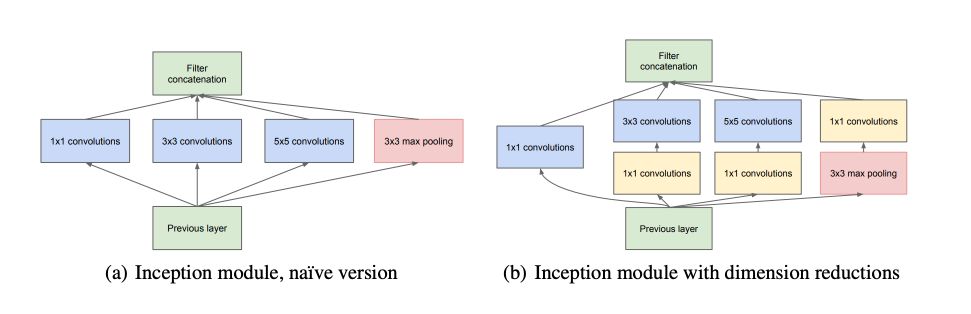
As these “Inception modules” are stacked on top of each other, their output correlation statistics are bound to vary: as features of higher abstraction are captured by higher layers, their spatial concentration is expected to decrease suggesting that the ratio of 3×3 and 5×5 convolutions should increase as we move to higher layers.
However, the computational cost of such a solution highly increases. For this reason, in the figure b, dimension reduction through 1X1 convolutions are used as dimension reduction techniques.
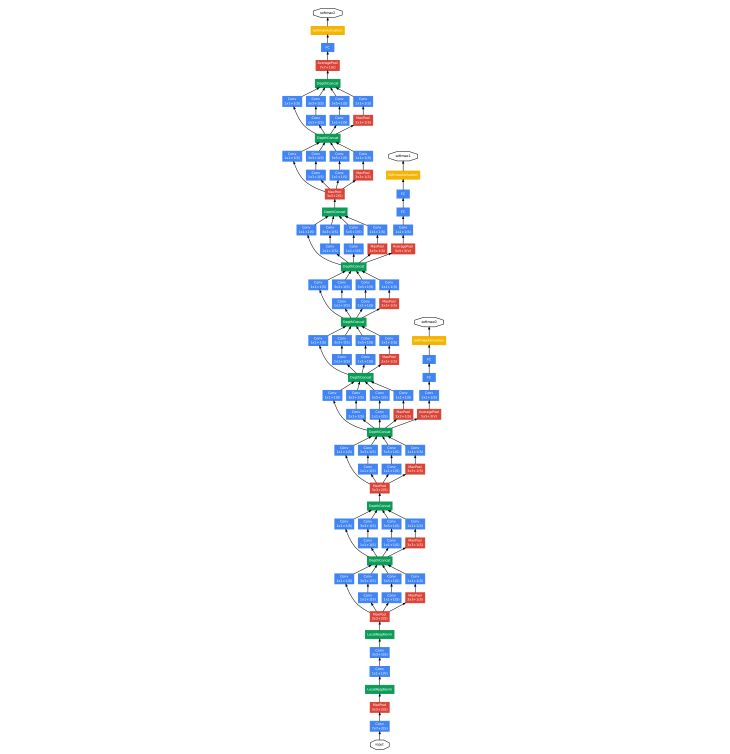
GoogLeNet
The most famous Inception-based algorithm is GoogLeNet, which corresponds to the team name of Google’s team in ILSVRC14. This was an homage to Yann LeCuns who introduced LeNet 5 network.
The architecture they went for was the following :
In Keras
Let’s import the required packages :
import keras
from keras.layers.core import Dense, Dropout, Activation, Flatten
from keras.layers.convolutional import Conv2D, MaxPooling2D, SeparableConv2D
from keras.regularizers import l2
from keras.optimizers import SGD, RMSprop
from keras.utils import to_categorical
from keras.layers.normalization import BatchNormalization
from keras.utils.vis_utils import plot_model
from keras.layers import Input, GlobalAveragePooling2D
from keras import models
from keras.models import Model
Import our data. I’m working on the Facial Emotion Recognition 2013 challenge from Kaggle. The path links to my local storage folder :
X_train = np.load(path + "X_train.npy")
X_test = np.load(path + "X_test.npy")
y_train = np.load(path + "y_train.npy")
y_test = np.load(path + "y_test.npy")
Define the input dimension and the number of classes we want to get in the end :
shape_x = 48
shape_y = 48
nRows,nCols,nDims = X_train.shape[1:]
input_shape = (nRows, nCols, nDims)
classes = np.unique(y_train)
nClasses = len(classes)
Now, let’s build our first inception layer!
input_img = Input(shape=(shape_x, shape_y, 1))

### 1st layer
layer_1 = Conv2D(10, (1,1), padding='same', activation='relu')(input_img)
layer_1 = Conv2D(10, (3,3), padding='same', activation='relu')(layer_1)

layer_2 = Conv2D(10, (1,1), padding='same', activation='relu')(input_img)
layer_2 = Conv2D(10, (5,5), padding='same', activation='relu')(layer_2)

layer_3 = MaxPooling2D((3,3), strides=(1,1), padding='same')(input_img)
layer_3 = Conv2D(10, (1,1), padding='same', activation='relu')(layer_3)

mid_1 = tensorflow.keras.layers.concatenate([layer_1, layer_2, layer_3], axis = 3)
As you might see, we are implementing figure b from the picture above. We can now flatten the output and add some dense layers :
flat_1 = Flatten()(mid_1)

dense_1 = Dense(1200, activation='relu')(flat_1)
dense_2 = Dense(600, activation='relu')(dense_1)
dense_3 = Dense(150, activation='relu')(dense_2)
output = Dense(nClasses, activation='softmax')(dense_3)
This quite simple architecture leads to 83’760’487 trainable parameters! Of course, one can even go deeper by addition layers connected to the mid_1 layer.
We can build the model :
model = Model([input_img], output)
If you would like to visualize the model architecture, use plot_model :
plot_model(model, to_file='model.png', show_shapes=True, show_layer_names=True)
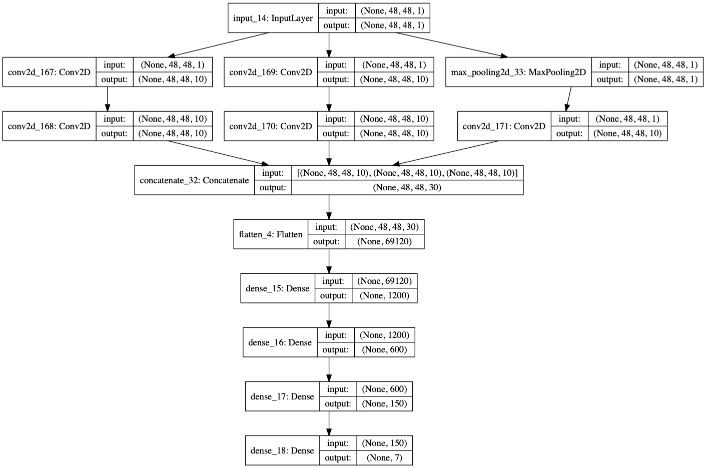
We are finally ready to compile the model.
model.compile(optimizer='adam', loss='categorical_crossentropy', metrics=['accuracy'])

batch_size = 128
epochs = 150
And run it!
history = model.fit(X_train, y_train, epochs=150, batch_size=64, validation_data=(X_test, y_test))
The Github repository of this article can be found here.
Conclusion : Inception models remain expensive to train. Transfer learning brings part of the solution when it comes to adapting such algorithms to your specific task.