

ZooKeeper is a centralized service for maintaining configuration information, naming, providing distributed synchronization, and providing group services. All of these kinds of services are used in some form or another by distributed applications. Zookeeper is useful if you would like to secure your architecture a little more and prevent from the consequences of the fall of your Masters for example.
Zookeeper (ZK) may be installed on its own on a node, or together with Spark/Cassandra on a worker node. Each ZK node should be aware of other ZK instances to form a quorum of 3. We chose to install zookeeper before Spark since the configuration is lighter.
SSH Connection to the nodes
The first step is to establish an SSH connection with the nodes on which you would like to install Zookeeper. For example, Master 1, 2, and 2 slaves. Recall :
ssh -i "<path to your keyPair directory>/Cluster_test_Key_Pair.pem" ubuntu@<copy the public DNS>
Install Apache-Zookeeper on your instances
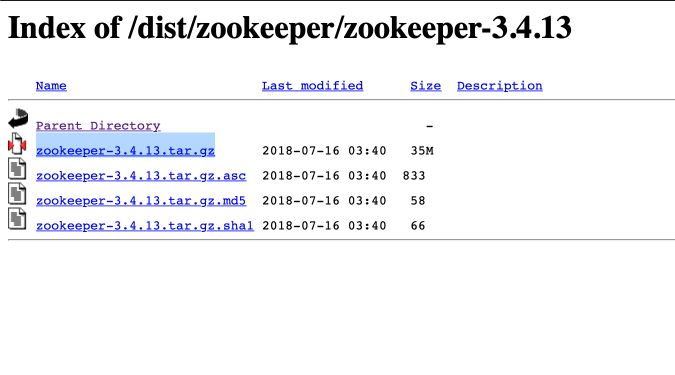
Copy this link : https://www-eu.apache.org/dist/zookeeper/zookeeper-3.4.13/
On each instance, go to the repository : /ubuntu/home/.
a. Download the .tar.gz file :
Once you’re in the good directory, execute the following command :
wget https://www-eu.apache.org/dist/zookeeper/zookeeper-3.4.13/zookeeper-3.4.13.tar.gz
You should see something like this :

Then, extract the software by executing the command below :
tar -xv zookeeper-3.4.13.tar.gz
We can remove the .tar.gz file :
rm zookeeper-3.4.13.tar.gz
The terminal of the nodes 1 & 2 looks like this :

Finally, we can execute the same commands for each install we would like to install Zookeeper on.
Configure your nodes
The steps toward the configuration of your nodes are the following :
- modify
zoo-sample.cfg - modify
spark-default.sh(covered in the next tutorial) - rename the directory
zookeeper-3.4.13 - create the directory
logsanddata - create a file
myidin the newdatadirèctory
a. Rename the directory :
Make sure you are in the home directory: /ubuntu/home/
Depending on the node you are working on, execute the following command by changing the digit at the end: mv zookeeper-3.4.13/ zookeeper_1
- 1: if you’re working on worker node 1
- 2: if you’re working on worker node 2
- 3: if you’re working on your node “Zookeeper”
b. Create the directory logs and data :
Now, you need to create those 2 directories :
mkdir data
mkdir logs
c. Create a new file myid :
Go on the new directory data and create a new file which contains only a digit between 1 and 3.
cd data
> myid.txt
vi myid.txt
Depending on the node you are working on, add the digit in the text file :
- 1: if you’re working on worker node 1
- 2: if you’re working on worker node 2
- 3: if you’re working on your node “Zookeeper”

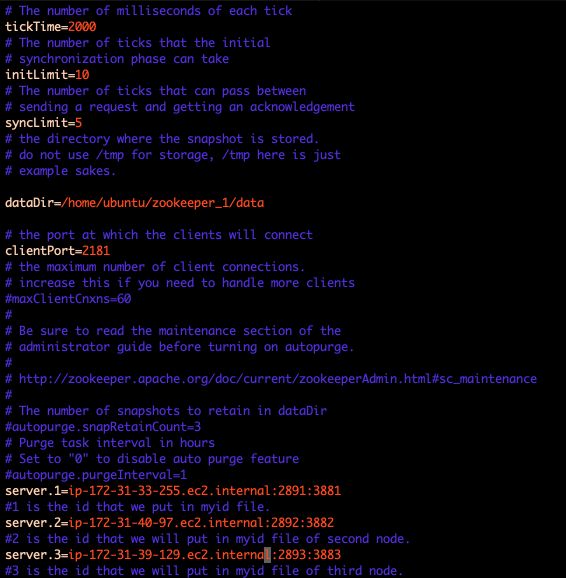
d. Modify the file zoo-sample.cfg :
Make sure you are on the “conf” directory :
cd ..
cd conf
Copy the file zoo-sample.cfg as zoo.cfg :
cp zoo-sample.cfg zoo.cfg
We will modify the file zoo.cfg file :
vi zoo.cfg
- add the line :
clientPort= 218X: Replace X by the digit defined above - add the line :
server.1=<PRIVATE.DNS.1>:2891:3881 ; server.2=<PRIVATE.DNS.2>:2892:3882 ; server.3=<PRIVATE.DNS.3>:2893:3883 - add the line:
datadir= <Path to the data dir>
Here’s an example :
Save (ESC + :wq) and quit.
e. Copy configuration files :
On the home directory (zookeeper_X), execute this line :
java -cp zookeeper-3.4.13.jar:lib/log4j-1.2.17.jar:lib/slf4j-log4j12-1.7.25.jar:lib/slf4j-api-1.7.25.jar:conf org.apache.zookeeper.server.quorum.QuorumPeerMain conf/zoo.cfg >> logs/zookeeper.log &
Repeat those steps on the three nodes. Do not forget that you need “OpenJDK-8” on each node.
Launch Zookeeper on each node
Right now, your configuration is ready on your Zookeeper Cluster. To execute Zookeeper, go on the bin directory and execute this command on each node :
./zkServer.sh start
*Conclusion *: Your quorum of 3 nodes with Zookeeper is now ready. The next step is to install Apache-Spark.