

This topic will help you install Apache-Spark on your AWS EC2 cluster.
We’ll go through a standard configuration which allows the elected Master to spread its jobs on Worker nodes.
The “election” of the primary master is handled by Zookeeper.
This tutorial will be divided into 5 sections.
- Install Apache-Spark on your instances
- Configuration of your Master nodes
- Configuration of your Slave nodes
- Add dependencies to connect Spark and Cassandra
- Launch your Master and your Slave nodes
The goal of this final tutorial is to configure Apache-Spark on your instances and make them communicate with your Apache-Cassandra Cluster with full resilience.
1. Install Apache Spark
a. A few words on Spark :
Spark can be configured with multiple cluster managers like YARN, Mesos, etc. Along with that, it can be configured in standalone mode. For this tutorial, I choose to deploy Spark in Standalone Mode.
** Standalone Deploy Mode ** : This is the simplest way to deploy Spark on a private cluster. Both driver and worker nodes run on the same machine. Standalone mode is good to go for developing applications in Spark. Spark processes run in JVM.
Java should be pre-installed on the machines on which we have to run Spark job.
b. Connect via SSH on every node except the node named Zookeeper :
Make sure an SSH connection is established. If you don’t remenber how to do that, you can check the last section of this tutorial.
c. On Spark’s Website :
For the sake of stability, I chose to install version 2.3.2.
If you want to choose the version 2.4.0, you need to be careful! Some software (like Apache Zeppelin) don’t match this version yet (End of 2018).
From Apache Spark’s website, download the tgz file :
https://spark.apache.org/downloads.html
d. Download the .tar.gz file :
On each node, execute the following command :
wget http://apache.mediamirrors.org/spark/spark-2.3.2/spark-2.3.2-bin-hadoop2.7.tgz
You should get something like this :

Make sure to repeat this step for every node.
e. Extract the software :
On each node, extract the software and remove the .tar.gz file by executing the command bellow :
$ tar -xv spark-2.3.2-bin-hadoop2.7.tgz
$ rm spark-2.3.2-bin-hadoop2.7.tgz
Replace the Spark version by the one you just selected. The terminal of your Master nodes will look like this :

The terminal of your Slave nodes will look like this :

f. ~/.bashrc file
You need to define the $SPARK_HOME path on each node.
In order to define the $SPARK_HOME , execute $ vi ~/.bashrc and paste the following code :
export JAVA_HOME=/usr/lib/jvm/java-8-openjdk-amd64
export JRE_HOME=$JAVA_HOME/jre
export PATH=$PATH:$JAVA_HOME/bin:$JAVA_HOME/jre/bin
export SPARK_HOME=/home/ubuntu/spark-2.3.2-bin-hadoop2.7
Make sure to replace the versions by the ones you selected above.
To quit and save changes :
Press ESC, type :wq then ENTER.
Back on your terminal, execute source ~/.bashrc
Make sure to iterate this step for every node.
2. Configuration of your Master nodes
We have 2 files to modify :
spark-env.shspark-default.conf
Those two files are in the conf directory from spark-2.3.2-bin-hadoop2.7.
Move in this directory and follow the following steps :
a. Save the original files :
First of all, you need to save the original files.
$ cp spark-env.sh.template spark-env.sh
$ cp spark-defaults.conf.template spark-defaults.conf

Let’s begin the modification of Spark configuration files.
b. spark-default.conf file :
Now, we’ll add some lines in the spark-default.conf file :
spark.master                        spark://PRIVATE_DNS_MASTER1:7077,PRIVATE_DNS_MASTER2:7077
spark.jars.packages                 datastax:spark-cassandra-connector:2.0.0-s_2.11
spark.cassandra.connection.host     <PRIVATE_DNS_Slaves> (separated by ',')
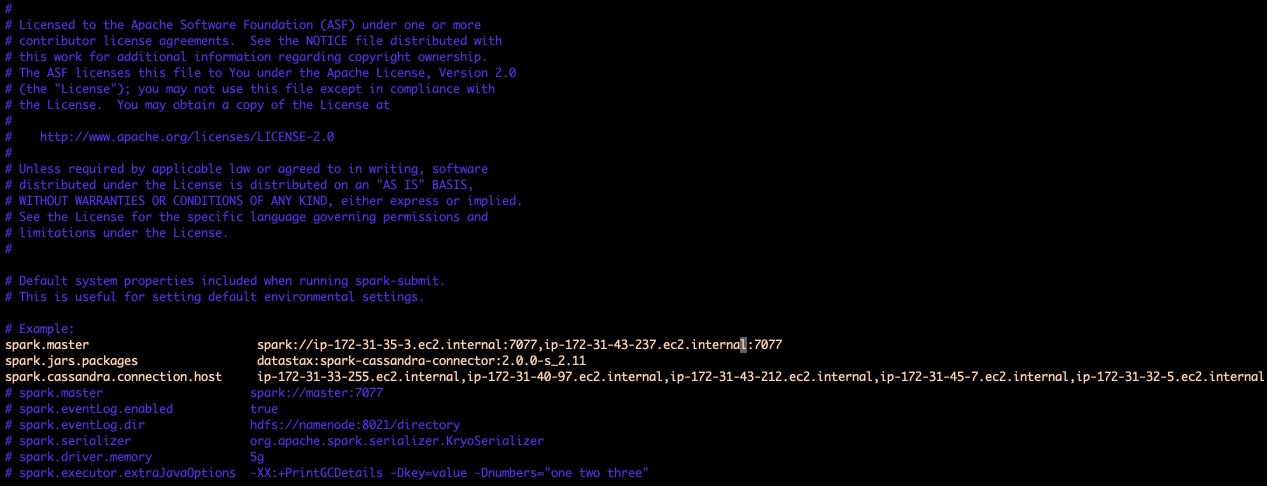
Here’s an example of my cluster :
spark.master                        spark://ip-172-31-35-3.ec2.internal:7077,ip-172-31-43-237.ec2.internal:7077
spark.jars.packages                 datastax:spark-cassandra-connector:2.0.0-s_2.11
spark.cassandra.connection.host     ip-172-31-33-255.ec2.internal,ip-172-31-40-97.ec2.internal,ip-172-31-43-212.ec2.internal,ip-172-31-45-7.ec2.internal,ip-172-31-32-5.ec2.internal
Example :
Save and quit.
c. spark-env.sh file :
Now, we’ll add some lines in the spark-env.sh file :
export SPARK_LOCAL_IP=<PRIVATE_DNS_this_NODE>
export SPARK_MASTER_HOST=<PRIVATE_DNS_this_NODE>
export SPARK_MASTER_OPTS="-Dspark.deploy.recoveryMode=ZOOKEEPER -Dspark.deploy.zookeeper.url=<PRIVATE_DNS_Node_Zk1>:2181,<PRIVATE_DNS_Node_Zk2>:2182,<PRIVATE_DNS_Node_Zk3>:2183"
Here’s an example of my Master2 node :
export SPARK_LOCAL_IP=ip-172-31-43-237.ec2.internal
export SPARK_MASTER_HOST=ip-172-31-43-237.ec2.internal
export SPARK_MASTER_OPTS="-Dspark.deploy.recoveryMode=ZOOKEEPER -Dspark.deploy.zookeeper.url=ip-172-31-33-255.ec2.internal:2181,ip-172-31-40-97.ec2.internal:2182,ip-172-31-39-129.ec2.internal:2183"
For example :

3. Configuration of your slave nodes
We have 2 files to modify :
spark-env.shspark-default.conf
These two files are in the conf directory from spark-2.3.2-bin-hadoop2.7.
Move inside this directory and follow the following modification.
a. Save the original files :
Save the original files :
$ cp spark-env.sh.template spark-env.sh
$ cp spark-defaults.conf.template spark-defaults.conf
Let’s start the modification of Spark configuration files.
b. spark-default.conf file :
Now open the file with vi and add some lines in the spark-default.conf file :
spark.master                        spark://PRIVATE_DNS_MASTER1:7077,PRIVATE_DNS_MASTER2:7077
spark.jars.packages                 datastax:spark-cassandra-connector:2.0.0-s_2.11
spark.cassandra.connection.host     <PRIVATE_DNS_Slaves> (separated by ',')
Here`s an example of my cluster :
spark.master                        spark://ip-172-31-35-3.ec2.internal:7077,ip-172-31-43-237.ec2.internal:7077
spark.jars.packages                 datastax:spark-cassandra-connector:2.0.0-s_2.11
spark.cassandra.connection.host     ip-172-31-33-255.ec2.internal,ip-172-31-40-97.ec2.internal,ip-172-31-43-212.ec2.internal,ip-172-31-45-7.ec2.internal,ip-172-31-32-5.ec2.internal
Example :
Save and quit.
c. spark-env.sh file :
Open the file and add those lines in the spark-env.sh file :
export SPARK_LOCAL_IP=<PRIVATE_DNS_this_NODE>
export SPARK_MASTER_HOST=<PRIVATE_DNS_MASTER1,PRIVATE_DNS_MASTER1>
Here`’s an example of my Slave1 node :
export SPARK_LOCAL_IP=ip-172-31-33-255.ec2.internal
export SPARK_MASTER_HOST=ip-172-31-35-3.ec2.internal,ip-172-31-43-237.ec2.internal
Example :

4. Add dependencies to connect Spark and Cassandra
The configuration of Spark for both Slave and Master nodes is now finished.
Therefore, if you want to use Spark to launch Cassandra jobs, you need to add some dependencies in the jars directory from Spark.
This part is quite simple. You just need to download some .jar files.
For each node, in the jars directory., execute :
sudo wget http://central.maven.org/maven2/com/twitter/jsr166e/1.1.0/jsr166e-1.1.0.jar;
sudo wget http://central.maven.org/maven2/com/datastax/spark/spark-cassandra-connector_2.11/2.4.0/spark-cassandra-connector_2.11-2.4.0.jar
Those two files are very important to link Spark and Cassandra.
5. Launch your Master and your Slave nodes
For this final section, I’ll show you how to launch Spark on all your nodes.
We will also check the Master Resilience handled by Zookeeper.
To make sure that your Spark cluster will be launched correctly, you should :
- Launch Zookeeper on all nodes on which the software is installed.
- Launch the two Spark Master
- Launch all Spark Worker nodes
a. Launch Zookeeper :
To execute Zookeeper, go on the Zookeeper_X/Bin/ directory and execute this command on each ZooKeeper node :
./zkServer.sh Start
b. Launch Spark on your Master nodes :
Go back to the Spark directory, and from the sbin directory, start your Master :
$ cd /home/ubuntu/spark-2.3.2-bin-hadoop2.7/sbin
$ ./start-master.sh

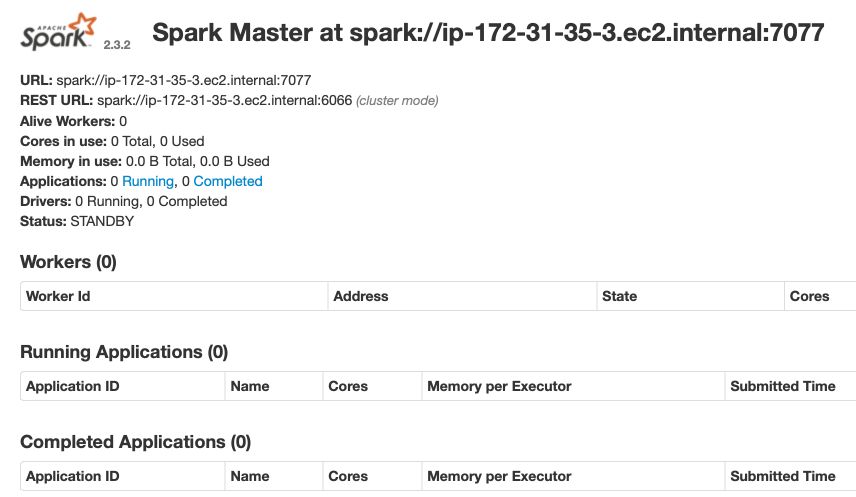
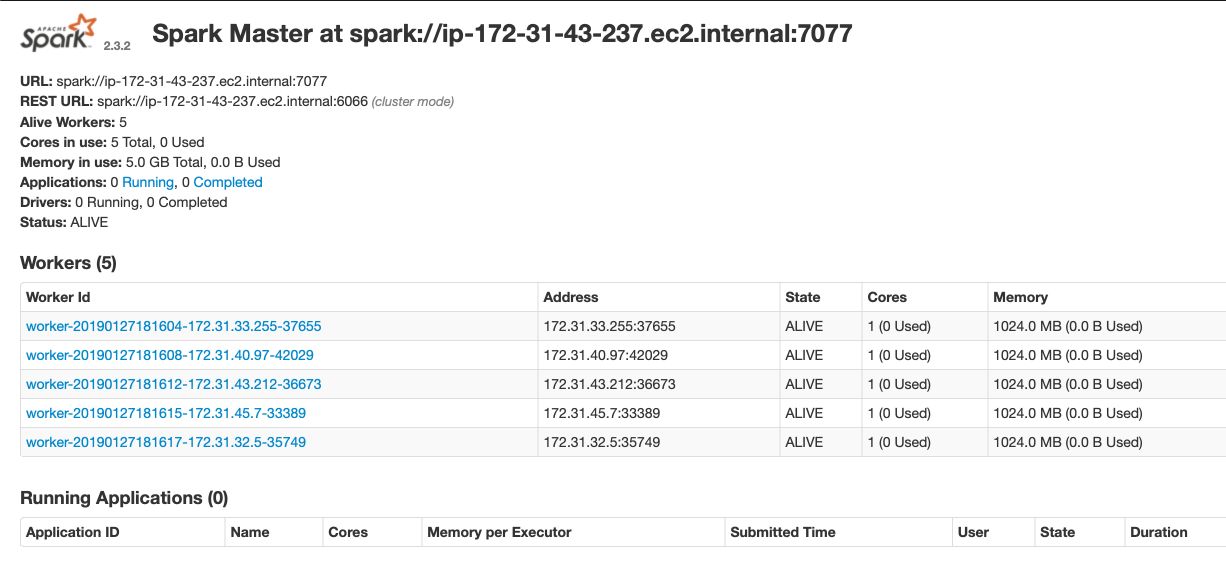
To get a snapshot of the cluster, n your browser, go on <IPV4_IP_Public_Master>:8080 from the Node’s Public IP.
You will see the following page :
c. Launch Spark on your Slave nodes :
The command line to launch Spark on all slave nodes is quite different. You have to specify the address of the Master 1 and 2.
$ cd /home/ubuntu/spark-2.3.2-bin-hadoop2.7/sbin
$ ./start-slave.sh spark://<PRIVATE_DNS_MASTER1>:7077,<PRIVATE_DNS_MASTER2>:7077
Here’s an example :

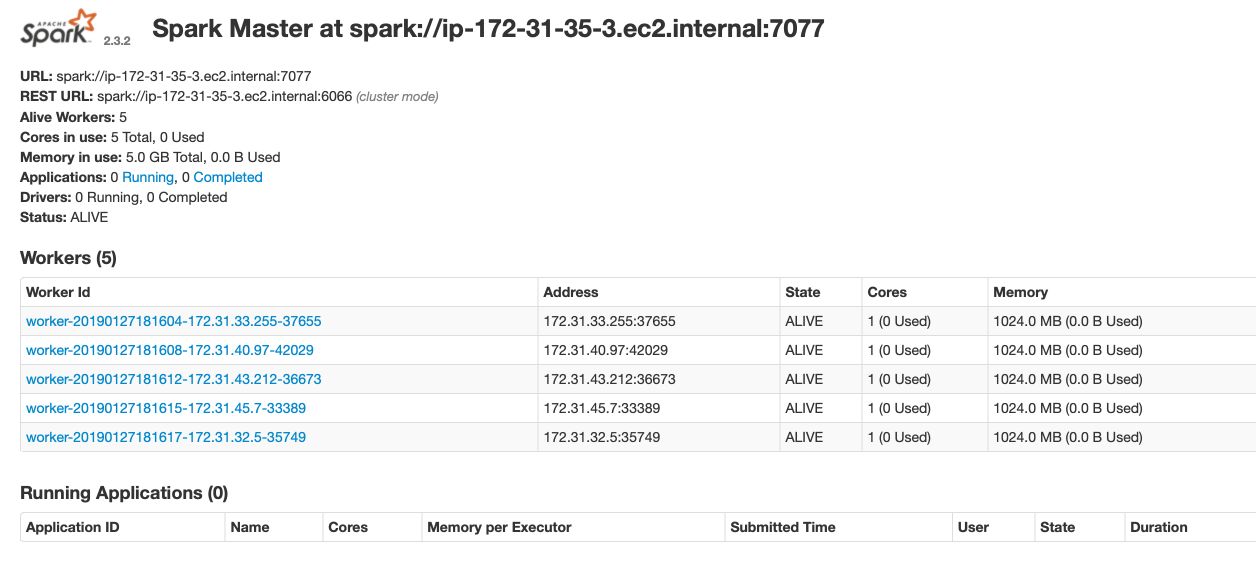
Once all slave nodes are running, reload your master browser page. All Worker nodes will be attached to the Master 1 :
d. Master Resilience :
What if you shutdown Master 1? Zookeeper will handle the selection of a new Master!
When you’ll stop Master 1, the Master 2 will be elected as the new Master and all Worker nodes will be attached to the newly elected master.
If you want to visualize what’s going on :
- Shutdown Master 1
- Check the port 8080 of Master 2
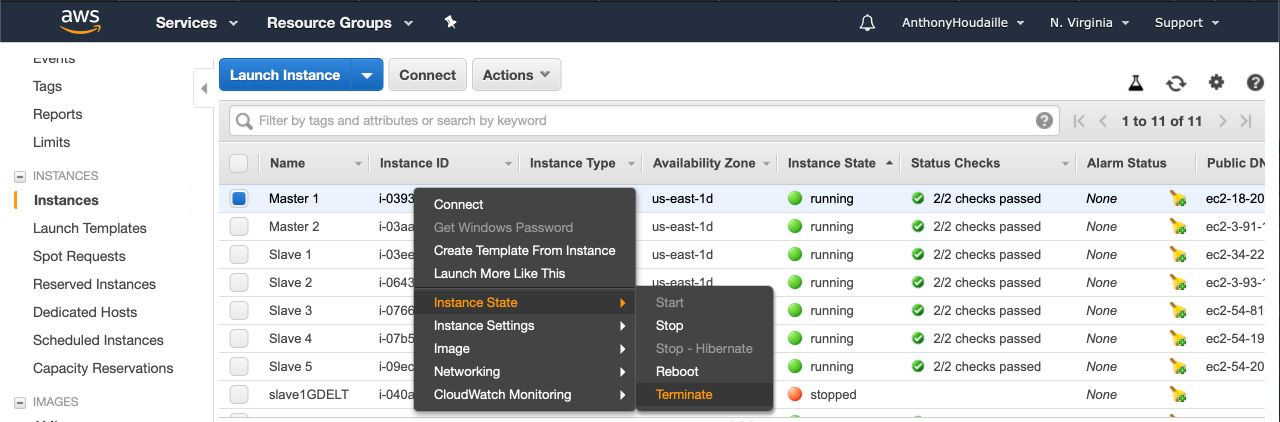
Check the transfer of Master :
Then execute :

You’ll see that Zookeeper elected Master 2 as the primary master :

From the Spark UI of Master 2, you’ll see that all slave nodes are now attached :
**Conclusion **: We covered the basics of setting up Apache Spark on an AWS EC2 instance. We ran both the Master and Slave daemons on the same node. Finally, we demonstrated the resilience of our Masters thanks to Zookeeper.